![m/v C:\[ESC]](https://mvcesc.wordpress.com/wp-content/uploads/2018/05/cropped-headerbw.png)
It’s been over a year since I’ve tried to use OpenCPN on a Raspberry Pi, and I thought I’d see what the community has done since then.
Wow.
Simply Wow.
A Raspberry Pi 3, with the latest versions of Raspbian/PIXEL and OpenCPN matches up as good as commercial entry-level chartplotters on the market today. This platform has really come a long way in the past year, and I’m truly impressed.
Recipe:
Hardware
- Raspberry Pi 3, Power and HDMI cables, SD card, & case
- HDMI Monitor
- USB Keyboard with integral trackpad
- USB Wifi Adapter
- GlobalSat BU-353-S4 USB GPS Receiver
- dAISy Hat AIS Receiver
Set Up Rasbian
- I burned the most recent version of Raspbian/PIXEL (March 2017) onto a 32GB SD card, inserted it into a RPi3, and booted. In seconds I had a desktop.
- Connect to WiFi with a USB dongle
- I removed the products I don’t need:
sudo apt-get purge wolfram-engine mathematica-fonts sonic-pi nodered libreoffice

sudo apt-get autoremove - Update Kernel to latest for OpenGL
sudo branch=next rpi-update - Reboot
sudo apt-get update

sudo apt-get upgrade

sudo apt-get install mesa-utils
sudo raspi-config- Set Timezone
- Set Locale and Keyboart to US English
- Change graphics memory split to 128MB
- Enable OpenGL Driver
- With Full KMS, I had problems with the display not working after a reboot, so I needed to use Fake KMS, Option G2. To recover, edit config.txt and comment out the dtoverlay=vc4-kms-v3d (or edit to be vc4-fkms-v3d)
- Turn off screen blanking
sudo nano /etc/lightdm/lightdm.conf- [SeatDefault]
- xserver-command=X -s 0 dpms
- Reboot
- Run glxgears
- I was running glxgears at 60fps and 2% CPU
- At full screen I saw 30fps and 11% CPU
- Run glxinfo
- Direct Rendering: yes
- Renderer string is the Gallium renderer, and not Software Rasterizer
- OpenGL Version string is 2.1 Mesa 13.0.0
Install OpenCPN
- Install required supporting tools
sudo apt-get install gpsd gpsd-clients screen- This required a reboot to work properly
- Install the OpenCPN software from the Ubuntu PPA
- In previous recipes I have built from source. To save time, and because building from source truly isn’t necessary, this time I just used the pre-built packages
sudo nano /etc/apt/sources.list- Add deb http://ppa.launchpad.net/opencpn/opencpn/ubuntu/ trusty main
sudo apt-key adv --keyserver keyserver.ubuntu.com --recv-keys C865EB40

sudo apt-get update

sudo apt-get install opencpn
- Download charts from NOAA
- I simply create a directory under the user account to hold all OpenCPN files, and a Charts subdirectory
- After extracting, to pre-render all the charts, from a terminal window run:
opencpn -unit_test_1 0
- Set up GPS
- I actually had a bit of difficulty for the first time in a while getting GPS set up. If I ran cgps or xgps I got no data, but running gpsmon showed a good solid fix
- This is the sequence of commands I followed to get it working (and works on subsequent reboots):
sudo dpkg-reconfigure gpsd
sudo nano /lib/systemd/system/gpsd.socket- Change
ListenStream=127.0.0.1:2947
to
ListenStream=0.0.0.0:2947
- Change
sudo nano /etc/default/gpsdSTART_DAEMON="true"
USBAUTO="true"
DEVICES="/dev/ttyUSB0"
GPSD_OPTIONS="-n"
GPSD_SOCKET="/var/run/gpsd.sock"
sudo killall gpsd

sudo gpsd /dev/ttyUSB0 -F /var/run/gpsd.sock
- Connect GPS to Opencpn
- Open Settings, Connections Tab. Click Add Connection
- Type: Network
- Protocol: GPSD
- Address: localhost
- DataPort: 2947
- Priority: 1
- Control Checksum: Checked
- Open Settings, Connections Tab. Click Add Connection
Setup dAISy Hat
- Update config.txt to enable UART
- sudo nano /boot/config.txt
- add the following lines
- # Enable UART
enable_uart=1- dtoverlay=p3-disable-bt
- add the following lines
- sudo nano /boot/config.txt
- Disable Console Serial
sudo nano /boot/cmdline.txt- remove the following:
console=serial0,115200
- remove the following:
- From the Menu, select Preferences->Raspberry Pi Configuration
- Interfaces Tab
- Enable Serial
- Interfaces Tab
- Reboot
- Test Hat Serial communication
- screen /dev/serial0 38400
- [ESC] brings up a menu
- ‘T’ sends a test message every 5 seconds
- [CTRL-A], ‘K’, ‘Y’ to exit
- screen /dev/serial0 38400
- Add AIS stream to OpenCPN
- Open Settings, Connections Tab. Click Add Connection
- Type: Serial
- DataPort: /dev/serial0
- Baudrate: 38400
- Priority: 1
- Control Checksum: Checked
- Open Settings, Connections Tab. Click Add Connection
Results
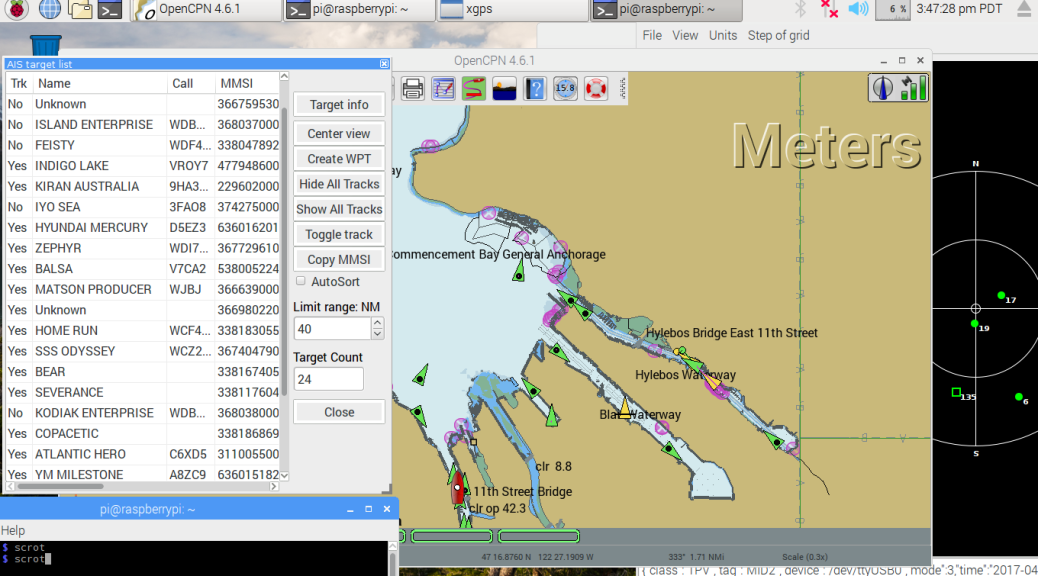
OpenCPN running ENC charts, with location set by GPS, and AIS contacts listed.

This also shows 24 AIS Targets in a list, as well as xgps running in the background. 6% CPU.

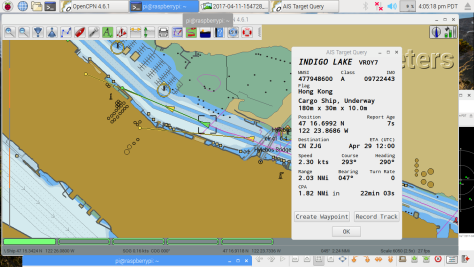
AIS Target Query. Deep zoom into the Hylebos waterway to find three vessels currently underway, including the cargo ship Indigo Lake. These vessels were approximately three miles away from my current location

If you used a Raspberry Pi 3 why did you need a WiFi adapter?
Because I just ported over my previous solution with the RPi2, and forgot entirely about the on-board Wifi. 🙂
There’s no need for the USB adapter.
Did you get a chance to look at the AIS QK-A022 module we sent you last autumn at all? We’re several upgrades on now but would still appreciate your comments.
I did… now that I have the RPi3 set up and running, I’m going to do that writeup next. Should be this weekend.
LIZ, our ward once had a murder scene to clean up, the victim was an inactive member who had no family who would admit it. Guess who did the clean up? The women.
Very cool, Matt! Thx for all the details. Have you thought of using a touchscreen?
I played around with touchscreens a while ago, but at the time it wasn’t the best experience with OpenCPN. I’ll try again, as I bet the android work on the product will have made a difference.
Hello, Total neophyte with Raspberry Pi.
Want to make an integrated Plotter using a Pi-2 and the Daisy Hat 2 channel receiver. Have not found any specific firmware/software for the Raspberry Hat install. Any references would be appreciated.
Thanks,
Winston Heisler
winstonheisler@hushmail.com
The Daisy Hat is simply a serial comm device at 38400 baud. There’s really no firmware or software needed, you just need software to consume it. It’s fairly close to plug and play — you just need to find out where the data is being written.
Every step of the installation is what I posted on here, but getting it to work on a RPi3 can be a bit of a pain because of what they did with bluetooth.
Or maybe I’m not understanding the question?
O.K. Now I understand… Will take a closer look at what you have.. Guess I’m biting off a little more than I can chew… Just don’t want to reinvent the wheel…
Thanks,
Winston
Have you tried the OpenPlotter image yet? Very powerful.
I have, and it’s a great solution as well. I choose not to use it, because I use the RPi for things other than simply chartplotter work — blogging, email, media player, etc.
Also, with the stock OS I know that I can follow any online guides and not have to worry about kernel parameters or other unexpected configuration differences.
I currently run the RPI2 and OpenCPN Ver 4.0.0. I want to upgrade to the latest ver of OpenCPN. Is there anything special I should know/do or can I use the instructions you have that are talking about the RPI3? Thanks!
I ran OpenCPN on a RPI2 without problems for a long time. These instructions should work just fine, but I haven’t tried.
Oh yea – can the RPI2 be set up to use an external HD? I would like to store all my charts there.
Absolutely. Any USB connected drive works well. I use Western Digital passport drives to store movies and music on and stream them to devices on the network.
Thanks. Can I just plug it into an open USB port or will I need to input a command so the RPI will recognize the drive? If there is a command, would you mind passing it along? Thanks very much.
It should just be plug and play.
Some external drives take a lot of power from the USB ports, and power management has been the one Achilles heel with the RPi in my experience. A powered external USB hub would solve it.
I attempted to turn off screen blanking per your instructions but my monitor continues to go to sleep. i see the command under the [SeatDefault]. Any thoughts? Prior upgrading to the new OS ver (which I really like) my monitor stayed on full time.
Thanks.
Outdated for Stretch?
Could you overlay AIS daisy receiver and Garming VTS on OpenCPN ?
A few hints for those that try to follow this recipe with Raspian Stretch:
1) I didn’t to the sudo branch=next step.
2) In sudo nano /etc/apt/sources.list, use “xenial main” instead of “trusty main”
3) Before apt-key, I had to run “sudo apt-get install dirmngr”
I followed this script with a Raspberry Pi 3+
Have you integrated with NMEA 2k gateways? I have an AIS receiver in my VHF, and I have a NMEA 2k->ethernet/WiFi gateway from Digital Yachts- the iKommunicate gateway. I’m planning to have the PI on an ethernet network. I’m looking at getting the Furuno radar that does Ethernet and WiFi also (a bit down the line) and it seems like that would be a good solution to displaying AIS info in a common format for all devices. I don’t plan on having an AIS transmitter on our Carver, since we only do river boating with it and we’re always in range of 4G LTE network, so I can run an AIS app on a tablet to output our position, and the VHF/AIS receiver for seeing everyone else. I may go ahead with an AIS transceiver for the sailboat when it is ready to do coastal cruising. Haven’t decide on that yet.
Not with NMEA2k yet. But I’m going to install a 2k backbone on my 4788 this winter, so I’ll see what that entails.. my plan was to use a USB->NMEA adapter (such as an Actisense) and add devices slowly. I like what SignalK is doing, and I have dreams of creating a fully digital dashboard sometime in the near future.
NMEA1083 is super easy (except for the 20 gauge wires!) with an FTDI adapter. I’ll blog my learnings on that soon.